6 posts tagged with "Coding"

View All Tags

· 8 min read

Shebang, or the interpreter directive

Have you ever wondered what's that magical first line that you put on top of your scripts, and starts with the characters #! ?

You might've seen it, for example, in the form of #!/usr/bin/env bash on the first line of every bash script you've ever written or seen.

But why is it there, and what does it do?

This so-called shebang line is a Unix feature which was introduced back in 1980 to allow for scripts to be run as executables by specifying the interpreter that the script needs to run itself. This simply means that with the shebang you're abstracting away the call to the interpreter, and instead of calling bash script.sh you can now just say ./script.sh. That's mostly all there is to it. And yes, it's technically called an interpreter directive.

What happens in the background, is that the program loader finds the interpreter you've specified in your PATH variable, runs it, and passes the location of your script to the interpreter as an argument. You can see that much in your process viewer as well.

$ cat > shebang.sh
#! /usr/bin/env bash
echo "SHEBANG!"
read
^C
$ chmod +x shebang.sh
$ ./shebang.sh & ps -aux | grep shebang
[2] 276038
SHEBANG!
kblagoev 276038 0.0 0.0 13156 3584 pts/5 T 13:55 0:00 bash ./shebang.sh

[2]+ Stopped ./shebang.sh
$ fg
./shebang.sh
^C
$

Interpreters, you say

If you've also written Python scripts, you surely have seen that you can pass a shebang to the python script as well. Since Python is an interpreted language, it actually works in precisely the same way w.r.t. the shebang line. You can simply write #!/usr/bin/env python3 at the top of your script, make it executable, and suddenly the program loader knows to run the python interpreter, and pass your script location as an argument.

test.py
#!/usr/bin/env python3

print("Hello from the Python interpreter")
$ chmod +x test.py
$ ./test.py
Hello from the Python interpreter

Well, JavaScript is interpreted too

Oh, how right you are! For some reason it never occured to me before, but since JavaScript is also a non-compiled, interpreted language, we should be able to make any scripts written in JS int executable files by providing a shebang line to it with some JS runtime like node or bun, right?

test.js
#!/usr/bin/env node

console.log("Hello from Node, it being a javascript interpreter and all")
$ chmod +x test.js
$ ./test.js
Hello from Node, it being a javascript interpreter and all

Yep. That's really cool, if you ask me! Now, technically there is a limitation here. As you've noticed, the shebang line starts with a hash symbol, and there's a good reason for that. The # symbol is used as a comment in many scripting languages, like shell and python, and it has been chosen for exactly that reason - to not break the syntax that the interpreter for shell expects. But in JavaScript # is not a comment. So, technically this would break JS syntax. And as such, it's up to each JS interpreter to implement the ignoring of shebang lines - basically a first line of a script file which starts with # or #! I guess. As such, with languages that don't support hash comments your milage may vary depending on the interpreter implementation. But hey, it works on node!

I leave it as an exercise for the reader to see if your favourite scripting language works with shebang lines :) Odds are, it does - as long as either the language already has # as a comment, or your interpreter has implemented ignoring shebang lines.

Arguments in a shebang line

Interpreter directive arguments

So, technically the the shebang syntax is defined as #! interpreter [optional-one-arg-only]. This means that the interpreter is actually the first value provided after the magic number #!. So, we could write simply #! /bin/bash and hope that the bash is located at /bin/bash.

But, as we've seen, we actually usually write more so something like #! /usr/bin/env bash, meaning that the "interpreter" is actually /usr/bin/env, and we have an additional optional param called bash. This isn't really what's happening though. What we're saying here, is that we are going to look for bash inside the PATH variable. This helps with the portability of scripts between different OSs, as we can't guarantee that the interpreter will be in the same location on each OS.

But, by doing this, we've also used up all of our 1 available optional arguments we can pass into the shebang line. So, if we need to pass an argument to an interpreter, we are out of luck.

arguments_not_working.js
#!/usr/bin/env node -e console.log(\"Running this through the shebang line\")

If we try running this, we would always get an error that saying "No such file or directory"

$ chmod +x arguments_not_working.js
$ ./arguments_not_working.js
/usr/bin/env: 'node -e console.log(\\"Running this through the shebang line\\")': No such file or directory
/usr/bin/env: use -[v]S to pass options in shebang lines

Passing multiple arguments to the shebang line

But hey, what's that thing on the bottom saying? Well, we can actually pass multiple arguments to the shebang line, using the -S flag! It's not guaranteed to work on every system, so it may reduce portability. But it's still a thing we can try.

arguments_working.js
#!/usr/bin/env -S node -e console.log(\""Running\_this\_through\_the\_shebang\_line\"")
$ chmod +x arguments_working.js
$ ./arguments_working.js
Running this through the shebang line

As you notice that the -S escape sequences can be somewhat nightmarish, but in more common scenarios you shouldn't need them that much.

You can also optionally replace the -S argument with -vS if you need to debug the arguments you're passing down to the interpreter.

$ ./arguments_working.js
split -S: 'node -e console.log(\\""Running\\_this\\_through\\_the\\_shebang\\_line\\"")'
into: 'node'
& '-e'
& 'console.log("Running this through the shebang line")'
executing: node
arg[0]= 'node'
arg[1]= '-e'
arg[2]= 'console.log("Running this through the shebang line")'
arg[3]= './arguments_working.js'
Running this through the shebang line

Nesting shebang calls

Now, we've been saying that the shebang line is used to specify an interpreter to run the script file. But what's an interpreter? On the highest of levels, it's some binary that can execute scripts in a given language. But for the purposes of the program loader, a binary is just an executable file. And at the start of the article said that we can make script files executable by providing them with a shebang line.

So, what's stopping us from calling any executable file from a shebang line, including files that are only executable because they have their own shebang line? Well, let me answer this clearly rhetorically stated by me question with the laconic "nothing". So, let's test this with a contrived example.

First, we create a JavaScript script with a shebang line.

~/code/scripts/js.js
#! /usr/bin/env node

console.log("Hi from JS")

Then, let us create a random-ass file with just a shebang line to call our JS script. Do notice the file locations specified.

sheshotmedown.bangbang
#! /usr/bin/env -S ${HOME}/code/scripts/js.js

Aaaand, let's see what we've done.

$ chmod +x sheshotmedown.bangbang js.js
$ ./sheshotmedown.bangbang
Hi from JS

Honestly, upon this realisation I just went "Daaaang!". You can basically set up a weird-ass dependency chain this way. Not that you'd want to, probably, but this is still hilariously amusing to me. Let's see if it works with one more layer, but with a local directory call.

ihittheground.bangbang
#! ./sheshotmedown.bangbang
$ chmod +x ihittheground.bangbang
$ ./ihittheground.bangbang
Hi from JS

Yep, we got it down. We can just call random executable files from within the shebang line.

And now with arguments

The last thing I wanted to showcase, is the fact that you keep passing the shebang arguments down the chain of calls. Let's do one final experiment

bangbang.js
#! /usr/bin/env -S BANG="He\_wore\_black\_and\_I\_wore\_white" node
console.log([...process.argv, process.env.BANG, "He would always win the fight"])
mybabyshotmedown.bangbang
#! /usr/bin/env -S ./thatawfulsound.bangbang "We\_rode\_on\_horses\_made\_of\_sticks"
thatawfulsound.bangbang
#! /usr/bin/env -S ./bangbang.js "I\_was\_five,\_and\_he\_was\_six" 
$ chmod +x mybabyshotmedown.bangbang thatawfulsound.bangbang bangbang.js
$ ./mybabyshotmedown.bangbang
[
'/home/kblagoev/.nvm/versions/node/v18.14.0/bin/node',
'/home/kblagoev/code/scripts/bangbang.js',
'I was five, and he was six',
'./thatawfulsound.bangbang',
'We rode on horses made of sticks',
'./mybabyshotmedown.bangbang',
'He wore black and I wore white',
'He would always win the fight'
]

As you can see, we kept the arguments we passed through the shebang lines down until the last call of the Node script. And additionally, we get the "interpreters" called from the shebang line as arguments as well. Pretty neat.

Anyway, I hope you've had fun with this, and maybe you can actually apply it somewhere - who knows. Have fun!

· 7 min read

Motivation

I've been trying to maintain a dotfiles repository for a few years now. There, I keep configurations for all kinds of different tools and applications I keep on my development machines. It's great for maintainability and versioning, but maintaining and keeping the dotfiles up to date can be a tedious task. But I've quite accidentally found a good and easy way to do it!

The three major options I've considered are:

  • Setting up a home directory as a --bare git repository.
  • Symlinking every configuration manually
  • Stow

The first option of the runt, is of course - from a storytelling point, the first one to discard.

Setting up your entire home directory as a repository, you have to be careful with exactly what to track, and what not. Basically, you'd need a .gitignore file that you'd have to constantly update with everything but the things you want to keep track of. It's very prone to accidentally adding something you don't want tracked, and forgetting to include it in the .gitignore. Plus, a giant git repo in my home directory isn't really to my taste.

Manual symlinking does solve those problems, but it can be quite complicated to automate and keep track of. Stow is an abstraction on top of symlinks, that allows us to automate symlink management, and turn it into package management. Let's see how to set up your dotfiles repo, in order to make use of stow.

Setup

Before using stow, my config files were laid out in a very simple way. Basically, everything that was in the $HOME/.config/ directory, was just copied into $HOME/code/dotfiles/.config/. Other configs that were just files or directories inside the $HOME directory, I just copied into the repo root $HOME/code/dotfiles/ - for example from $HOME/.bashrc to $HOME/code/dotfiles/.bashrc.

~/code/dotfiles
.
|-- .bashrc
|-- .config
| |-- gtk-3.0
| | `-- [... files]
| |-- i3
| | `-- [... files]
| |-- nvim
| | |-- after
| | | |-- ftplugin
| | | | `-- [... files]
| | | `-- plugin
| | | `-- [... files]
| | |-- init.lua
| | |-- lua
| | | `-- kiroki
| | | `-- [... files]
| | `-- plugin
| | `-- [... files]
| `-- terminator
| `-- [... files]
|-- i3blocks
| `-- [... files]
`-- .local
`-- share
`-- fonts
`-- [... files]

How stow likes it

Stow works more like (or exactly like) a package manager. We have to think of each configuration we manage as a package. So, instead of having a bunch of configurations under the .config directory, like $HOME/code/dotfiles/.config/i3 and $HOME/code/dotfiles/.config/nvim, we can split these into separate directories, in this example $HOME/code/dotfiles/i3/.config/i3 and $HOME/code/dotfiles/nvim/.config/nvim.

We can name them however though, so it could be $HOME/code/dotfiles/foo/.config/i3 for our i3 config.

And technically, if we want to be not-so-clever, we can just do something like $HOME/code/dotfiles/my-dot-config-directory/.config/<everything like i3 and nvim>. But the power of stow is that we can stow and unstow each config like a package. This technically means, that we can also version our configs. For example, we could have one version of i3 for Arch under $HOME/code/dotfiles/i3-arch/.config/i3, and one for Ubuntu under $HOME/code/dotfiles/i3-ubuntu/.config/i3. Because of these reasons, I recommend this package structure.

For another example, the .bashrc file is typically right in the $HOME directory, so we can "package" it simply as $HOME/code/dotfiles/bash/.bashrc. I know, I know - who uses bash anymore... well, I do apparently :)

tip

Stow is technically a package manager. To make full use of it, we can turn every configuration we contain in our dotfiles into a package, by placing it in its own directory.

How it is now

After we migrate to using stow, our repo structure now looks like this:

~/code/dotfiles
.
|-- bash
| `-- .bashrc
|-- fonts
| `-- .local
| `-- share
| `-- fonts
| `-- [... files]
|-- gtk-3.0
| `-- .config
| `-- gtk-3.0
| `-- [... files]
|-- i3
| `-- .config
| `-- i3
| `-- [... files]
|-- i3blocks
| `-- i3blocks
| `-- [... files]
|-- nvim
| `-- .config
| `-- nvim
| |-- after
| | |-- ftplugin
| | | `-- [... files]
| | `-- plugin
| | `-- [... files]
| |-- init.lua
| |-- lua
| | `-- kiroki
| | `-- [... files]
| `-- plugin
| `-- [... files]
|-- stow_config.sh
`-- terminator
`-- .config
`-- terminator
`-- [... files]

Usage

Stowing

Well, great. So far, we've basically just moved some directories around. So, what now?

Well, now we can just run stow for each of these newly created packages. The way that stow works, is that it takes the directory inside of the "package" directory, and creates a symlink to it in the parent of the current working directory.

So, for example, if we now cd into $HOME/code/dotfiles/, we can run stow i3. What this will do is, it will create a symlink to $HOME/code/dotfiles/i3/.config/i3 in $HOME/code/.config/. That will look something like this:

lrwxrwxrwx  1 kblagoev kblagoev   30 Oct  6 23:14 i3 -> ../code/dotfiles/i3/.config/i3/

"But wait!", I hear you say. "Isn't this i3 directory, or symlink, or whatever, supposed to be in our $HOME directory? What is it doing in $HOME/code/?".

You're absolutely right. Let's fix this. Stow has a flag -t, or --target, with which we can specify the root of the package management. This target is by default the parent of the pwd, and that's why by running stow inside of $HOME/code/dotfiles/, the symlinking occurred under $HOME/code/ (and resulted in our symlink being $HOME/code/.config/i3. It can be a bit confusing to keep track of this, but yeah). So, instead, we want to target the $HOME directory. That's why we should run stow -t $HOME i3 instead.

tip

If we don't place our dotfiles repository in the $HOME directory, we have to target it when we use stow by utilising the -t flag, e.g. stow -t $HOME i3.

Unstowing

Removing a config is super simple with stow as well. Following our example with i3, we can simply run stow -D -t $HOME i3. The -D flag deletes the symlink, and our config is gone from the $HOME/.config/ directory. And only that config!

Additional note on Usage

There is a flag --dotfiles, which allows to rename hidden directories, such as .whatever-the-name-is to dot-whatever-the-name-is, and for them to be pre-processed by stow by replacing dot- with .. This is useful, so there aren't hidden files and directories in the repo. Quite useful for easier searching that respects hidden files.

This is great and all, but in the latest version of stow on Ubuntu there's a bug with that. The bug is fixed in the newest release of stow, but I will wait for it to get updated in apt, before migrating to that setting - just for availability reasons.

But if you're going to install the latest version of stow, do keep that option in your mind. It's pretty neat.

And lastly, for my own convenience, I've written a bash script which can stow and unstow all the packages inside my repo with one command. I've opted into having a manually updated list of the packages, just because I keep some other junk in the dotfiles repo, but this can be changed. I will paste the script here, if you'd like to use it yourself (or a modified version of it).

stow_config.sh
#!/bin/bash

# Define an array of package names
packages=(
"bash"
"gtk-3.0"
"i3"
"i3blocks"
"terminator"
"nvim"
"fonts"
)

# Check if the first argument is "remove" to use the -D flag
stow_flag="-t"
if [ "$1" == "remove" ]; then
stow_flag="-D -t"
fi

# Loop through each package and run stow or unstow with -D
for package in "${packages[@]}"; do
if [ "$1" == "remove" ]; then
echo "Unstowing $package..."
else
echo "Stowing $package..."
fi

stow $stow_flag "$HOME" "$package"

if [ $? -eq 0 ]; then
if [ "$1" == "remove" ]; then
echo "$package unstowed successfully."
else
echo "$package stowed successfully."
fi
else
if [ "$1" == "remove" ]; then
echo "Error unstowing $package."
else
echo "Error stowing $package."
fi
fi
done

echo "All done!"


Running ./stow_config.sh will stow, and running ./stow_config.sh remove will unstow the listed packages.

That's it! glhf

· 5 min read

Motivation

If you're like me, you try and keep all of your coding-based clutter on a virtual machine. Which usually works great. You can maintain a clean OS, separate work from pleasure, and quickly return to a snapshot if something goes terribly wrong. But when I tried doing development for Android from a virtual machine, I quickly arrived at an unexpected hurdle.

If you try and run Android Studio's emulators, you'll quickly be reminded that you can't simply run a virtual machine inside a virtual machine. You technically can, if you enable Nested VT-x/AMD-V, but even if you succeed navigating the hell of starting an AVD android emulator from inside your VM, you'd be met by the huge performance hit of running nested virtualisation.

You can instead consider running either the Genymotion emulator or Xamarin Android Player, which both use Oracle's VirtualBox to run their emulators. But instead of running them inside your VM (and being met with the issue of nested virtualisation), you can run these emulators on your host OS. Since both of these use VirtualBox, you can take full use of the networking aspect of VMs to connect your development VM to your Android emulator VM!

note

Hence, my solution is to have two separate virtual machines running in VirtualBox on the host OS, and let them communicate using networking.

Setup

I'm assuming you've already

  1. Downloaded and installed VirtualBox
  2. Set up a development VM inside of VirtualBox
  3. Connected your dev VM to the outside world using either NAT or Bridged networking (I personally use bridged, since it helps me to easier access any web dev instances running in the VM)

Creating a virtual device

Alrighty, now we can download and install either Genymotion emulator or Xamarin Android Player on your host OS.

After you've done that, you can start up your software, and set up a virtual device (phone) by following the instructions.

created virtual device

Now we need to do some configuration work inside VirtualBox.

Configuring the virtual mobile device

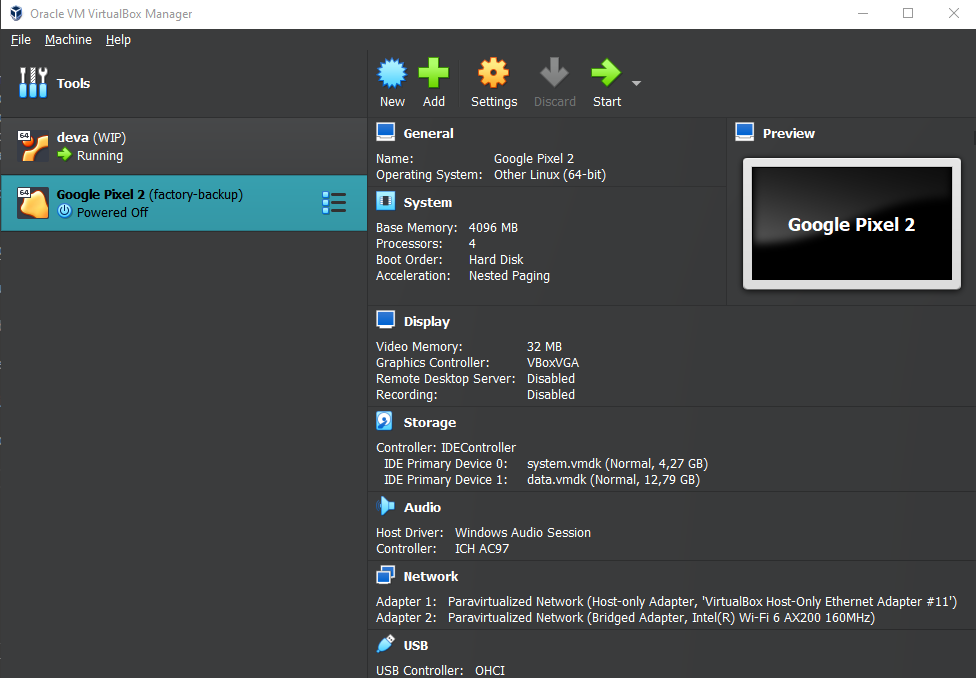
If you open up VirtualBox, you'll see that the newly created virtual mobile device is listed in the list of machines.

list virtual devices

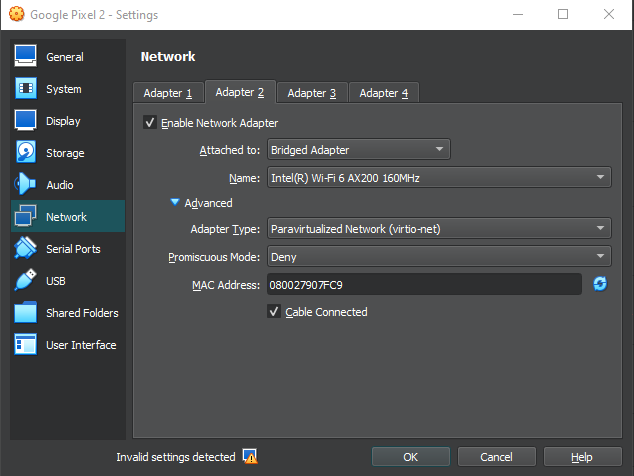
We need to edit the network settings for the mobile device. It will need two adapters. One is to connect to the network of the development machine (NAT or Bridged). In my case the machines are in a bridged network, which makes it easier to access from the host OS, as well as between each-other.

tip

For some development platforms like React-Native, it's important that both the dev machine and mobile device are on the same network to allow easy debugging.

mobile bridged adapter

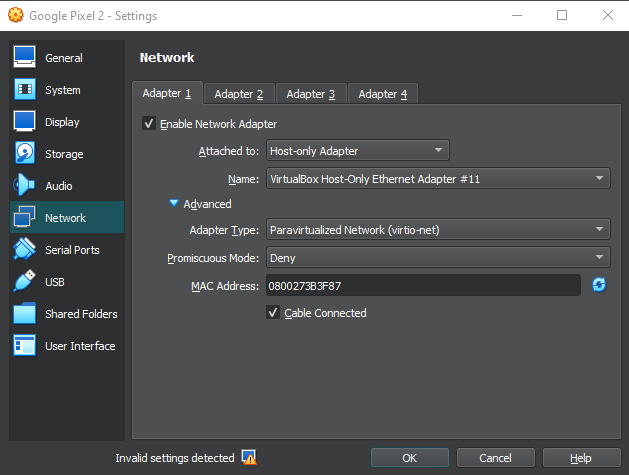
The other, arguably more important adapter to add/enable is the Host-only Adapter. This is the one adb will connect over.

mobile host-only adapter

Make note of the adapter name here!

VirtualBox has the habit of creating multiple host-only adapters, so this name is very important to make note of.

Configuring the development VM

Now that we have set the mobile device settings up, we need to mirror them in the develpment VM. If you've used NAT for the mobile device, redo the settings in the development one. If you've put it into a bridged network, do the same to the dev VM.

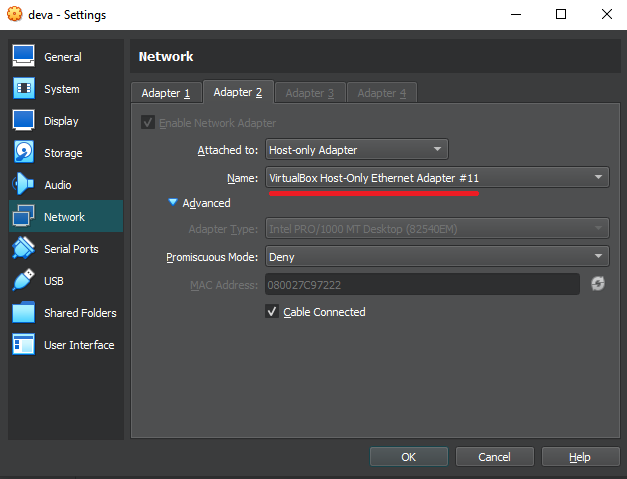
After this, we need to add a Host-only Adapter to the dev VM. Did you take note of the Adapter name from the mobile machine? This is where you use it!

dev machine host-only adapter

Starting up the machines

Normally, you just start them from their respective applications. Start the mobile machine from Xamarin or Genymotion, and start your dev VM from VirtualBox.

But I've found that if I start the mobile machine from Genymotion, it tends to reset the Host-only Adapter name, add a new one, and fail to start. So, if this happens to you, this is what I do:

  1. Start the mobile machine from VirtualBox. A command-line terminal will pop up, and will start loading.
  2. When it appears that the terminal isn't doing anything anymore, you can safely start the mobile device from Genymotion.

mobile device ready to be started from genymotion

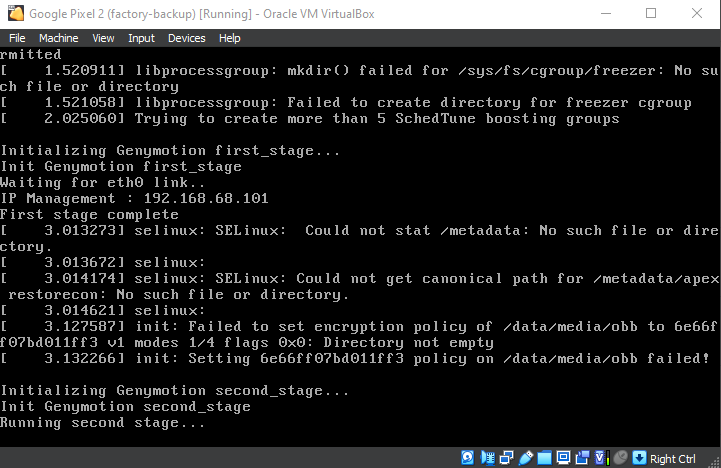
This is how my terminal looks when it stops loading. At this stage, I start the device from Genymotion as normal.

If you haven't already, you can now start your development VM as well.

Connecting to the mobile device

In this scenario, we are going to use adb to connect to the mobile device from the dev VM. All we need is the IP that the device is running on. Both Genymotion and Xamarin provide some way to see the IP.

genymotion shows ip

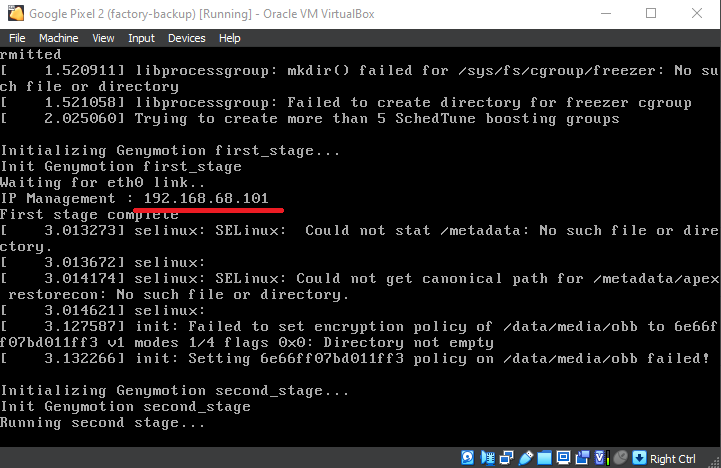
But if you're having trouble to find it, you can go to VirtualBox, and see the IP from the terminal we saw earlier.

virtualbox shows ip

So, now we can easily connect from our dev VM using the command-line tool adb

kblagoev@deva:~/Android/Sdk/platform-tools$ ./adb connect 192.168.68.101
* daemon not running; starting now at tcp:5037
* daemon started successfully
connected to 192.168.68.101:5555
kblagoev@deva:~/Android/Sdk/platform-tools$

Success!

And since I've used a bridged network, I can also easily do network connections between the two devices, which can be quite useful in some cases. So I recommend it, unless you have your own way of doing it.

Now you can develop! Have fun!

· 14 min read
  1. Quantum Programming by abstracting ourselves from Quantum Mechanics: Abstraction level 0
  2. Quantum Programming - Abstraction level 1: Logic Gates (this)
  3. Quantum Programming - Abstraction level 2: State Machine and Algorithms

We have previously worked out that a quantum computer operates logically on qubits, which are the quantum counterparts of classical bits. We've learned that a qubit can stay in a superposition while we operate on it, and then we can collapse it into a definite state upon measurement. So, for the majority of our time spent programming on the quantum computer, we will be thinking of the qubits in their state of superposition.

What would be extremely useful for our intuition now, would be to have a way to visualise this superposition. Enter the Bloch Sphere. This tool allows us to represent the whole state-space of a single qubit in one (very simple) geometric shape - the unit sphere. Think of it as the unit circle in trigonometry.

· 7 min read

Rational numbers are easy. They include the integers, with which you can count up and down the number line, as well as fractions - written as the division of two integers or as a finitely-long decimal expansion.

But there aren't that many rational numbers on the real number line, as there are irrationals. These beasts of infinitely-long decimal expansions take the vast majority of the infinity of real numbers. They can't be written as a fraction, and they can't be written exactly as a decimal expansion (it would be infinitely long).

· 15 min read

In two previous posts we got to know two main things:

  1. We can analyse the behaviour of groups of animals using statistical tools like correlation functions
  2. We can simulate this behaviour using for example the Vicsek model, and by analysing it the same way as natural groups we can measure the accurateness of the model in replicating natural phenomena.

We also learned that the standard Vicsek model suffers from one weakness: it lacks an inertial term, which seems to be important in imitating the behaviour of biological systems. So the goal of this post will be to figure out a way to simulate the Vicsek model with time delay. Let's start by

Analysing the equations of motion

vi(t+1)=v0RηΘ[vi(t)+jinijvj(t)],\vec{v_i}(t+1) = v_{0}\mathscr{R}_{\eta}\Theta \left[ \vec{v_i}(t) + \sum_{ j \neq i }{ n_{ij} \vec{v_j}(t) } \right] ,
ri(t+1)=ri(t)+vi(t+1).\vec{r_i}(t+1) = \vec{r_i}(t) + \vec{v_i}(t+1) .