
· 13 min read

A long preamble

As a programmer, it's often shocking to me the rift that exists between writing software, and knowing how a computer works. Web developers probably have it the toughest. You can write your React TODO app, and in no time have it effortlessly do dynamic checkboxing galore at the low low cost of thousands of megabytes of memory. And you never have to think about the stupid amount of abstractions that happen under the hood to make this work. The transpiling of Typescript to JavaScript. The JavaScript interpreter building bytecode on the fly. The network protocols defining forms and shapes of data, so that it can be sent, received and parsed by independent participants. The services that the host operating system runs to facilitate all those middle steps. The weaving and bobbing of data between your user space "server" and the OS kernel. The processor threads spawning in and out of existence at the speed of light. It's just insane how much happens under the hood. And all written by humans, by the way.

I have slowly begun to accept that I will never know all of these inner workings and how they function. But my everlasting internal strive for freedom shouts and begs. It wants me to know more, so I can do more. In my vain attempt at achieving ever broader knowledge, I recognise the opportunity to learn to do better at things I am but adequate at. Or, at least such are the delusions of a man, who just wants, nay - needs to always know more.

The Gedankenexperiment

In that vein, I propose a thought experiment. Imagine that, due to circumstances out of the scope of this experiment, you find yourself locked in a basement. You have no wants for food or drink, but you need to communicate with the outside world. You have a PC in the basement. And it has a network cable plugged into it. You try turning the PC on, but all you see is the standard IBM PC BIOS start, and that classic POST check happen, with the ubiquitous high-pitched electronic bing to notify you that all is indeed good. But all is not good. The machine has no operating system, so you can't even check your Twitter, to make yourself feel good for being locked in a basement. All of that raw computing power right there in front of you, and you can't do anything with it!

An example image to make your heart drop a beat.

You look around, and you find also a classic 3.5 inch floppy disk sitting on the desk (no, it's not a 3D-printed save icon), waiting patiently to be inserted into the floppy drive of the (apparently ancient) PC. You recognise the disk. You know it's just short of being empty, apart from something small on the boot sector of it.

A plan is now condensing onto the dimpled glossy surface of your brain like morning dew on motherboards laying in an electronics garbage dump. You need to write an operating system, some network drivers, a client for one of the hundreds of network protocols, and send a message out!

The question posed for the thought experiment is: what is on the floppy disk's boot sector, such that it would allow you to bootstrap the process?

note

At the end of this preamble, I want to point out that I'm no OS developer, and this is not a series of articles to teach you how to structure and create the next Linux kernel. This is just me playing around, breaking a lot of things, and learning along the way. Take the information here with a grain of salt, and mainly for entertainment purposes. What I'm doing here may seem obvious to you, or just plain boring - or it may be as weirdly magical and thought-provoking as it is for me. In either case, you might find something you enjoy. But you've been forewarned - an OS development course this ain't.

The bootloader

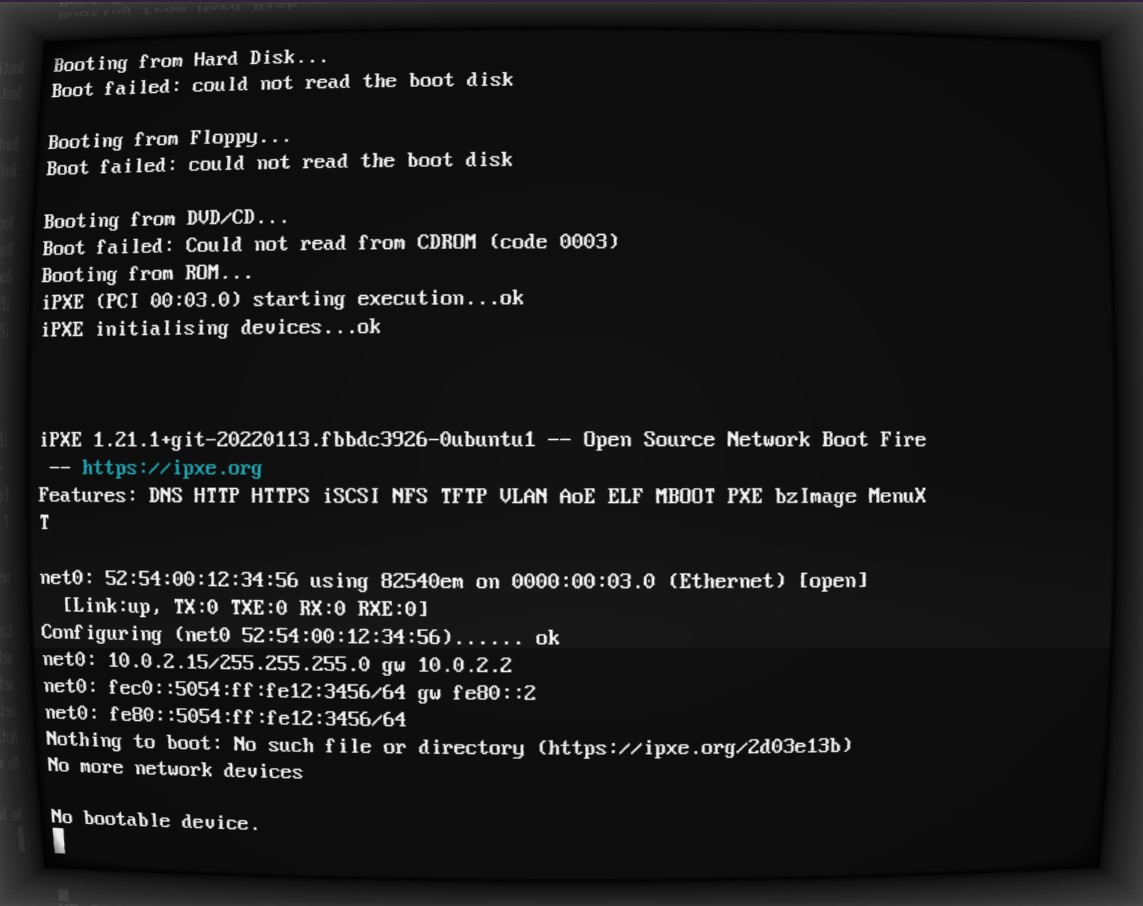
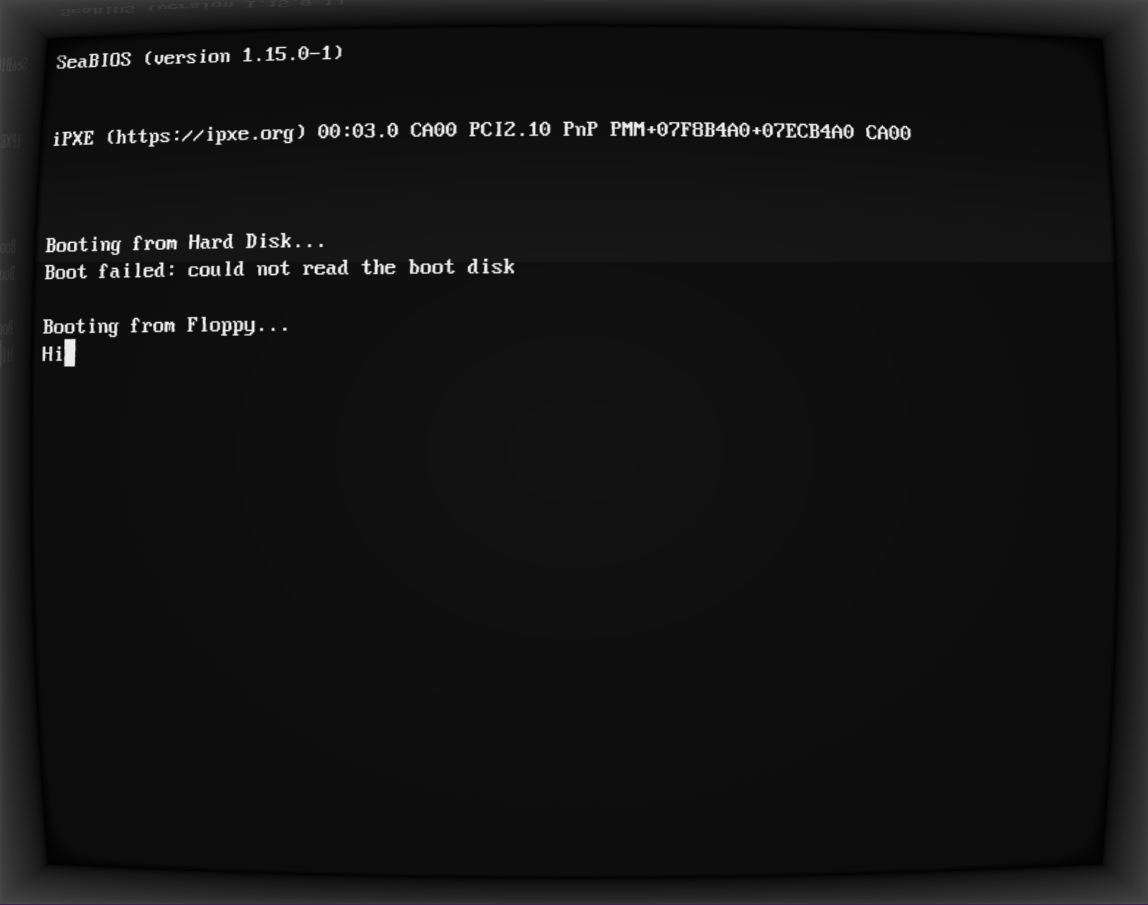
Modern IBM compatible PCs differ from hunks of expensively produced rocks of precious materials in one big way - they tend to have a Basic Input Output System (BIOS) installed on a ROM somewhere on their motherboards. This little program has two main jobs - running a diagnostic Power-On Self-Test (POST), and then giving the control to a user-provided program, which can further utilise the BIOS interrupts if it so desires.

As it can be seen on the screenshot above, the BIOS will look for bootable devices amongst different media such as CD-Roms, hard-drives and floppy drives. What it's looking for in particular is a so-called bootloader program, located on the medium's boot sector. What's a boot sector? Just a piece of memory, which is exactly 512 bytes long, and ends on the magic number 0xAA55. The BIOS will just take these 512 bytes of memory, plop them on memory address 0x7C00, and execute them. From there on, it takes no responsibility for what happens, apart from providing some basic input/output capabilities in the form of so-called BIOS interrupts.

So, our first goal is now becoming clearer. We need to write a program which is up to 512 bytes large, pad the remaining memory with zeroes, and end it with the magic number. Inside of this program, we can make use of BIOS interrupts.

The last thing we need to take into account is how we address memory. This is a huge topic with regards to how it's done in any operating system/hardware combo. For the purposes of this initial step, we can skip the explanations, and just state as a fact, that we will address memory using the so-called "16-bit real mode". So, we can just address anything we want from address 0x0000 to 0xFFFF. And I mean it when I say anything. We can just read and overwrite anything in that range, potentially just breaking stuff along the way.

Well, we've pretty much established the first set of constraints of what needs to happen for our thought experiment. On the floppy disk our past selves have thoughtfully provided for us to use, we need to have a program, which:

  • Is no larger than 512 bytes.
  • Needs to know it will be put on memory address 0x7C00.
  • Has to end on the magic number 0xAA55.
  • Can address memory using 16-bit numbers.
  • Can use BIOS interrupts to communicate with hardware.

Wilson

So, let's turn our silicon-rock-of-a-computer into a virtual Wilson. I'm providing the assembly snippet that can make that happen, with comments. I hope those comments make sense, since I will attempt to not explain the code in text too much.

[BITS 16]        ; Use 16-bit mode (x86 real mode)
[ORG 0x7C00] ; Origin - BIOS loads boot sector at memory address 0x7C00

start:
; Print 'H'
mov ah, 0x0E ; BIOS teletype output function (INT 10h, AH=0Eh)
mov al, 'H' ; Character to print
int 0x10 ; Call BIOS interrupt to display the character

; Print 'i'
mov ah, 0x0E ; BIOS teletype output function
mov al, 'i' ; Character to print
int 0x10 ; Call BIOS interrupt to display the character

; Infinite loop to prevent the bootloader from proceeding
hang:
jmp hang

; Boot sector signature (must be 0xAA55 for BIOS to recognize it as bootable)
times 510-($-$$) db 0 ; Fill the rest of the boot sector with zeroes
dw 0xAA55 ; Boot sector magic number

I suspect that the only thing which is harder to grasp is the interrupts themselves. They are just another set of magic numbers that point to routines loaded into memory by BIOS itself. There exists a comprehensive list of BIOS interrupts out there, for those curious about them.

As to how I compile this, put it on a floppy and run it in an emulator: you can check my repository on the matter, called zilch. Now, let's see how Wilson is doing.

Hi, Wilson.

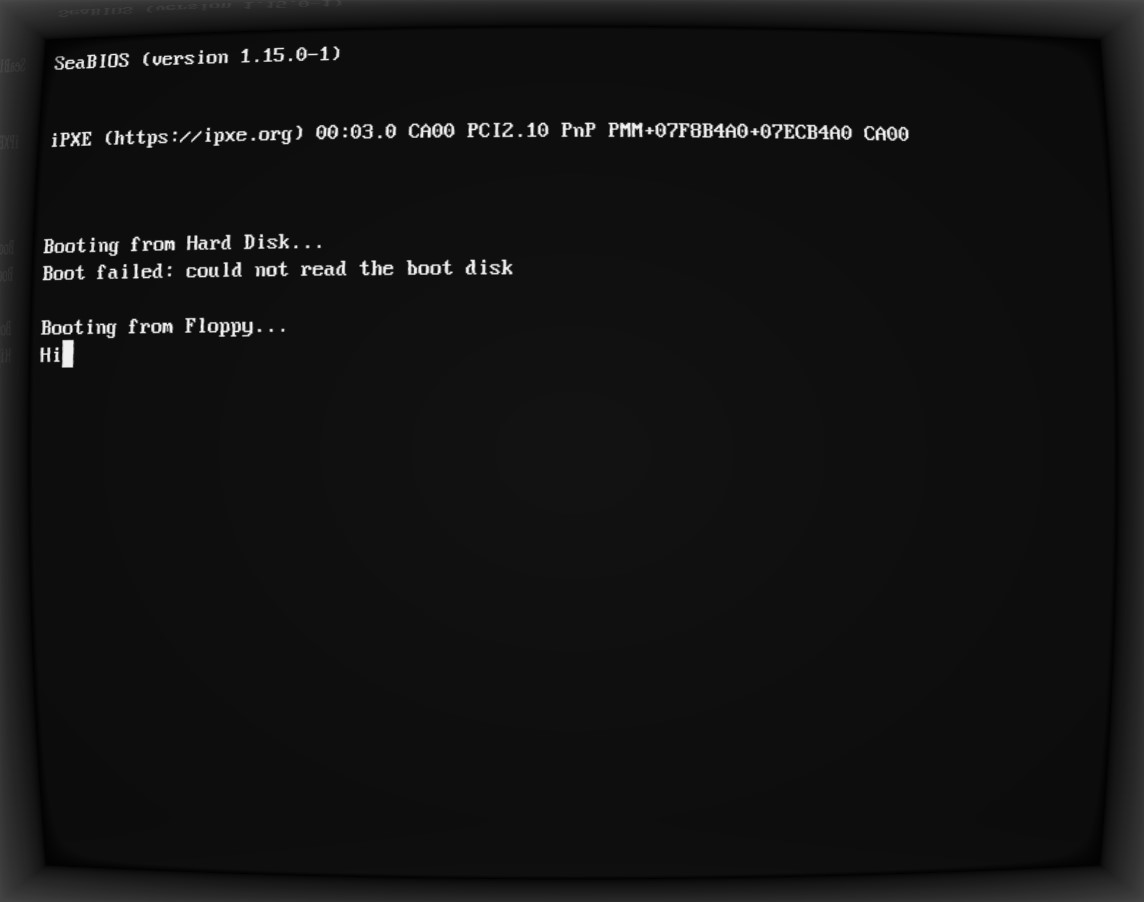
Excellent! The beginnings of a long-lasting friendship, I'd imagine.

The monitor

Now, Wilson is cool and all, but we have to push forward in order to achieve the true objective of our thought experiment. We need to have a program, which would bootstrap our OS-development efforts. If our past selves left a floppy disk with a program that just prints Hi on the screen, I don't think we'd get too far. Or be pleased with ourselves.

What we need is a program, which can receive input from the keyboard, and at some point execute whatever we input. This is called a monitor. Let's start real-simple-like, and define our monitor as such:

  1. The monitor can read keyboard strokes.
  2. The input will be called the program.
  3. The user can input the program using octal code (numbers in base 8 (digits from 0 to 7)).
  4. The monitor will translate this input into hex (numbers in base 16), so that it can be understood as memory addresses, opcodes, and BIOS interrupts.
  5. The user won't see what they're typing.
  6. The user won't be able to edit what they type. If they make a mistake, they need to restart the computer and start from scratch.
  7. The program will be stored on the boot sector, in the empty space between the end of the monitor, and the magic number 0xAA55.
  8. If the user types anything different from a digit from 0 to 7, the monitor will execute the program that has been input so far.

Point 7 limits the size of our program to (512<size of bootloader>) bytes(512 - \text{<size of bootloader>})\text{ bytes}. It can be very easily avoided, but let's just keep it for now, as a minimalism thing.

Well, in all honesty, I just described exactly the operation of our little monitor, so let's just see it written in assembly.

[BITS 16]
[ORG 0x7C00] ; BIOS loads the boot sector here

; Main loop
main:
mov si, program ; Initialize pointer to the program array
input_loop:
mov cx, 3 ; Read 3 digits
digit_input:
; Read a character from the keyboard
call getch
sub al, '0' ; Convert ASCII to numerical value
cmp al, 7
ja execute_program ; If input is greater than '7', jump to execute the program

; Multiply the current byte by 8 and add the new digit
mov bl, byte [si]
shl bl, 3
add bl, al
mov byte [si], bl
loop digit_input

; Move to the next byte in the program array
inc si
jmp input_loop

; Execute the program stored in memory
execute_program:
call program

; Infinite loop (halt the CPU)
jmp $

; Function to read a character from the keyboard using BIOS interrupt 0x16
getch:
mov ah, 0x00
int 0x16
ret

; Reserve the remaining space on the boot sector for the program we input
program: times 510-($-$$) db 0
; Boot sector magic number
dw 0xAA55

Again, the only special thing in the code itself is that we use BIOS interrupt 0x16 to read keyboard input. The monitor reads the input, waits for three consecutive digits from 0 to 7 to be input, translates them into hex and stores them in memory. If it detects anything different from these 8 digits, it just jumps to the program we've input so far, and executes it.

Why 3-digit numbers? Well, with 3 digits in octal we can represent 2 digits in hex (0o377 = 0xFF), which are 8 bits in binary (0xFF = 0b11111111). And so, once we have 3 digits in octal, that means we have a 1 byte number (as long as the octal number is <= 0o377), which we can go ahead and store into memory as the next byte. Let's look at an example. If we input the number 020 into the monitor, this will be translated to the hex byte 0x10. Do you know what that byte means? We've seen it before - it's the BIOS interrupt for printing onto the screen!

So, not only can we put random numbers into our monitor, that may or may not mean anything, we can input opcodes, BIOS interrupts and variables into it, constructing machine code that the computer can just run. We've gone to the lowest of low levels! We aren't even writing assembly anymore, we are literally speaking CPU-ese now.

Now, I've gone through the trouble of translating our Wilson program into octal machine code for us to use. It's just short enough, so we can test our monitor with it:

264 016 260 110 315 020 264 016 260 151 315 020 364

All we have to do now is put our monitor on a floppy, start our PC with it inserted, wait for the BIOS to load the monitor (and display nothing), blindly input the machine code from above (without spaces!), hit a key which is larger than 7, and see if we can revive Wilson!

Hi, Wilson...again

I mean, at this point you really have to trust me that I did this...or go and do it yourself, using the code in the repo.

So far - so good

In an extremely minimalistic way, we've technically achieved the requirements of the thought experiment. We have now a monitor program, which boots from the boot sector of a floppy disk, and in which we can input machine code to be executed directly from memory.

The next step would be to write a better monitor program, which has more text-editing capabilities. Then, maybe write a small assembler, so that we can write assembly instead of machine code, and assemble and run it. At that point, we will probably want to also escape real-mode, and go into 32-bit protected mode. Then we can even start writing and compiling C! And then we're really off to the races.

But let's just take a minute to appreciate what we've achieved. We do technically have the first step towards bootstrapping an entire computer from BIOS! If we are patient and damn-stubborn enough, we can build an OS from this by never leaving Wilson's keyboard again!

I will do all of these steps, and more, but for the time being I will leave this as is, so it doesn't become too cumbersome to read. I'm going to continue posting on the subject, so keep an eye out! Meanwhile, I hope you've enjoyed the ride so far, and are looking forward to more Bootstrapping from BIOS shenanigans! Have fun!

· 8 min read

Shebang, or the interpreter directive

Have you ever wondered what's that magical first line that you put on top of your scripts, and starts with the characters #! ?

You might've seen it, for example, in the form of #!/usr/bin/env bash on the first line of every bash script you've ever written or seen.

But why is it there, and what does it do?

This so-called shebang line is a Unix feature which was introduced back in 1980 to allow for scripts to be run as executables by specifying the interpreter that the script needs to run itself. This simply means that with the shebang you're abstracting away the call to the interpreter, and instead of calling bash script.sh you can now just say ./script.sh. That's mostly all there is to it. And yes, it's technically called an interpreter directive.

What happens in the background, is that the program loader finds the interpreter you've specified in your PATH variable, runs it, and passes the location of your script to the interpreter as an argument. You can see that much in your process viewer as well.

$ cat > shebang.sh
#! /usr/bin/env bash
echo "SHEBANG!"
read
^C
$ chmod +x shebang.sh
$ ./shebang.sh & ps -aux | grep shebang
[2] 276038
SHEBANG!
kblagoev 276038 0.0 0.0 13156 3584 pts/5 T 13:55 0:00 bash ./shebang.sh

[2]+ Stopped ./shebang.sh
$ fg
./shebang.sh
^C
$

Interpreters, you say

If you've also written Python scripts, you surely have seen that you can pass a shebang to the python script as well. Since Python is an interpreted language, it actually works in precisely the same way w.r.t. the shebang line. You can simply write #!/usr/bin/env python3 at the top of your script, make it executable, and suddenly the program loader knows to run the python interpreter and pass your script location as an argument.

test.py
#!/usr/bin/env python3

print("Hello from the Python interpreter")
$ chmod +x test.py
$ ./test.py
Hello from the Python interpreter

Well, JavaScript is interpreted too

Oh, how right you are! For some reason it never occured to me before, but since JavaScript is also a non-compiled, interpreted language, we should be able to make any scripts written in JS into executable files by providing a shebang line to it with some JS runtime like node or bun, right?

test.js
#!/usr/bin/env node

console.log("Hello from Node, it being a javascript interpreter and all")
$ chmod +x test.js
$ ./test.js
Hello from Node, it being a javascript interpreter and all

Yep. That's really cool, if you ask me! Now, technically there is a limitation here. As you've noticed, the shebang line starts with a hash symbol, and there's a good reason for that. The # symbol is used as a comment in many scripting languages, like shell and python, and it has been chosen for exactly that reason - to not break the syntax that the interpreter for shell expects. But in JavaScript # is not a comment. So, technically this would break JS syntax. And as such, it's up to each JS interpreter to implement the ignoring of shebang lines - basically a first line of a script file which starts with # or #! I guess. As such, with languages that don't support hash comments your milage may vary depending on the interpreter implementation. But hey, it works on node!

I leave it as an exercise for the reader to see if your favourite scripting language works with shebang lines :) Odds are, it does - as long as either the language already has # as a comment, or your interpreter has implemented ignoring shebang lines.

Arguments in a shebang line

Interpreter directive arguments

So, technically the the shebang syntax is defined as #! interpreter [optional-one-arg-only]. This means that the interpreter is actually the first value provided after the magic number #!. So, we could write simply #! /bin/bash and hope that the bash is located at /bin/bash.

But, as we've seen, we actually usually write more so something like #! /usr/bin/env bash, meaning that the "interpreter" is actually /usr/bin/env, and we have an additional optional param called bash. This isn't really what's happening though. What we're saying here, is that we are going to look for bash inside the PATH variable. This helps with the portability of scripts between different OSs, as we can't guarantee that the interpreter will be in the same location on each OS.

But, by doing this, we've also used up all of our 1 available optional arguments we can pass into the shebang line. So, if we need to pass an argument to an interpreter, we are out of luck.

arguments_not_working.js
#!/usr/bin/env node -e console.log(\"Running this through the shebang line\")

If we try running this, we would always get an error that saying "No such file or directory"

$ chmod +x arguments_not_working.js
$ ./arguments_not_working.js
/usr/bin/env: 'node -e console.log(\\"Running this through the shebang line\\")': No such file or directory
/usr/bin/env: use -[v]S to pass options in shebang lines

Passing multiple arguments to the shebang line

But hey, what's that thing on the bottom saying? Well, we can actually pass multiple arguments to the shebang line, using the -S flag! It's not guaranteed to work on every system, so it may reduce portability. But it's still a thing we can try.

arguments_working.js
#!/usr/bin/env -S node -e console.log(\""Running\_this\_through\_the\_shebang\_line\"")
$ chmod +x arguments_working.js
$ ./arguments_working.js
Running this through the shebang line

As you notice that the -S escape sequences can be somewhat nightmarish, but in more common scenarios you shouldn't need them that much.

You can also optionally replace the -S argument with -vS if you need to debug the arguments you're passing down to the interpreter.

$ ./arguments_working.js
split -S: 'node -e console.log(\\""Running\\_this\\_through\\_the\\_shebang\\_line\\"")'
into: 'node'
& '-e'
& 'console.log("Running this through the shebang line")'
executing: node
arg[0]= 'node'
arg[1]= '-e'
arg[2]= 'console.log("Running this through the shebang line")'
arg[3]= './arguments_working.js'
Running this through the shebang line

Nesting shebang calls

Now, we've been saying that the shebang line is used to specify an interpreter to run the script file. But what's an interpreter? On the highest of levels, it's some binary that can execute scripts in a given language. But for the purposes of the program loader, a binary is just an executable file. And at the start of the article said that we can make script files executable by providing them with a shebang line.

So, what's stopping us from calling any executable file from a shebang line, including files that are only executable because they have their own shebang line? Well, let me answer this clearly rhetorically stated by me question with the laconic "nothing". So, let's test this with a contrived example.

First, we create a JavaScript script with a shebang line.

#! /usr/bin/env node

console.log("Hi from JS")

Then, let us create a random-ass file with just a shebang line to call our JS script. Do notice the file locations specified.

sheshotmedown.bangbang
#! /usr/bin/env -S ${HOME}/code/scripts/js.js

Aaaand, let's see what we've done.

$ chmod +x sheshotmedown.bangbang js.js
$ ./sheshotmedown.bangbang
Hi from JS

Honestly, upon this realisation I just went "Daaaang!". You can basically set up a weird-ass dependency chain this way. Not that you'd want to, probably, but this is still hilariously amusing to me. Let's see if it works with one more layer, but with a local directory call.

ihittheground.bangbang
#! ./sheshotmedown.bangbang
$ chmod +x ihittheground.bangbang
$ ./ihittheground.bangbang
Hi from JS

Yep, we got it down. We can just call random executable files from within the shebang line.

And now with arguments

The last thing I wanted to showcase, is the fact that you keep passing the shebang arguments down the chain of calls. Let's do one final experiment

bangbang.js
#! /usr/bin/env -S BANG="He\_wore\_black\_and\_I\_wore\_white" node
console.log([...process.argv, process.env.BANG, "He would always win the fight"])
mybabyshotmedown.bangbang
#! /usr/bin/env -S ./thatawfulsound.bangbang "We\_rode\_on\_horses\_made\_of\_sticks"
thatawfulsound.bangbang
#! /usr/bin/env -S ./bangbang.js "I\_was\_five,\_and\_he\_was\_six" 
$ chmod +x mybabyshotmedown.bangbang thatawfulsound.bangbang bangbang.js
$ ./mybabyshotmedown.bangbang
[
'/home/kblagoev/.nvm/versions/node/v18.14.0/bin/node',
'/home/kblagoev/code/scripts/bangbang.js',
'I was five, and he was six',
'./thatawfulsound.bangbang',
'We rode on horses made of sticks',
'./mybabyshotmedown.bangbang',
'He wore black and I wore white',
'He would always win the fight'
]

As you can see, we kept the arguments we passed through the shebang lines down until the last call of the Node script. And additionally, we get the "interpreters" called from the shebang line as arguments as well. Pretty neat.

Anyway, I hope you've had fun with this, and maybe you can actually apply it somewhere - who knows. Have fun!

· 8 min read

Preamble

At this point, I think it's no secret that Winamp going "open-source" has been a bit of a shit-show.

The initial outrage on the repository was in response to the apparent lack of understanding of what open-source means on the side of Winamp, as they claim that their license is "copyleft", while allowing for neither redistribution of modified versions, nor contributions to the official project, and initially not even allowing forking! Someone did point it out to them that they can't ban forking on GitHub, as that constitutes a violation of the TOS. So, Winamp updated their license to allow forking, but it still doesn't allow anything else that would constitute "open-source" - redistribution or even outside contributions.

A truly historic moment, ladies and gentlemen :)

In objective terms, this license falls in the category of "source-available" rather than open-source, and this is an important distinction to make. I have no problem with Winamp making their source available as a valuable case-study, but they really shouldn't have used the term "copyleft" if that is the intention.

But we're here to discuss more so another glaring issue with the repository, which might actually end up landing a lawsuit at Winamp's doors. And sadly, they can't really do anything about it anymore.

A rough overview of GitHub

In its simplest form, GitHub can be described as a web-hosted git server for the public. As a developer interested in open-source, you can create a git repository, write some incredible code that you AND your mum are really proud of, and share it with the world on GitHub, so everyone can appreciate your contribution to the democratisation of programming.

But GitHub is more than simply a place to host your git repository. It is also a collaboration platform, where anyone who feels like they like your code, and would like to change it until they love it, can "fork" your repository. Forking is in fact not a more aggressive version of spooning, but simply the act of making a clone of the original repository in your account. This forked repository contains all the history of the original - all the code, and all the commits that came before the fork.

Back to the beauty that is the Winamp GitHub repo

If you were to peruse the code on the Winamp repository in the first few days after its publishing, you would have noticed some very intriguing things. For example, a BuildTools directory which included things like whole executable files the 7zip, git, and other programs just hanging around, designated as "build tools". And although very odd indeed, these things seem more so stupid than harmful.

But there's much more there! Inside the repo there was proprietary code from Dolby, some questionable SDKs which Winamp may or may-not have the right to redistribute, an entire directory containing the commercial version of Qt, some, admittedly expired, credentials, and so on, and so forth.

Winamp did take some action

There are numerous pull requests deleting said files, and the maintainers did also remove a lot, if not all the unlicensed code. And they did this... in public. You can clearly see many of the commits that delete stuff right there on the commits page. Which, you know, is a problem. If you open any of the commits listed there, you can simply look at the code that was deleted. If you simply clone that repository locally, you can move around that history and see it at the times before it was removed. This public deletion without rebasing just does nothing.

They deleted some of the commits

OK well, if you just scroll around the commits history, you will notice that the commits that delete, for example the Dolby code is nowhere to be found. But in the end, that doesn't really do anything either, since you can still just go back in history to a commit before they deleted it, and just see it there.

Does this count as distribution?

Ok, what can they do?

I mean, they could just rebase everything, this would theoretically get rid of the commit history. They'd need to get rid of pull requests as well, since those contain code from certain history positions. And to be honest, at this point I'd just delete the repo from GitHub, clean up the codebase locally, and create the GitHub repo anew.

But really, even that would not be enough anymore.

A lesser-known "feature" of GitHub

Remember how I said that they deleted some of the commits from their history, so you can't simply see what code they removed? Well, even though that commit is gone from the git history, and you wouldn't see it even if you cloned the repository locally... you can still see it on GitHub.

You see, to facilitate collaboration through forking, GitHub introduces something called a "repository network". This network holds information of the "upstream" or parent repository, all of its forks, and all the commits that belong to each fork.

Additionally, GitHub caches commits, so that they can be accessed by other repositories in the repository network. As explained by Github themselves:

GitHub stores the parent repository along with forks in a "repository network". It is a known behavior that objects from one network member are readable via other network members. Blobs and commits are stored together, while refs are stored separately for each fork. This shared storage model is what allows for pull requests between members of the same network.

So, not only are the deleted commits potentially visible inside of forks that may have this commit from before it was deleted in the upstream repository. No, they are also just visible in general, as long as you know the commit hash. GitHub simply caches them, and you can just visit the page for that commit, and see all the changes it has made, and the entire code-base at that point in history.

You can still see deleted commits on GitHub

So, even if you rebase your repository, the commits history is still there, cached and awaiting. And all forks that were made before the rebase, you can just peruse those anyway.

Now, to be fair - GitHub has an entire docs section about leaking sensitive data. It does mention that you can contact support, and request the cached commits to be removed, if they deem that sensitive data has been exposed.

So, what if GitHub clears the cache, and we delete the repo?

Well, nothing. It has been already forked more than 2600 thousand times as of the time I'm writing this. It's out there on GitHub :) A lot of the forks were even made before anything was deleted from the repo. So you don't even have to rely on cached commit hashes. In the same docs page I linked above, GitHub themselves say that yeah - if someone has forked your repo, you're on your own, buddy.

If you remove the upstream repository of a repository network, GitHub simply designates another fork to be the upstream one. And all of that history and cached commits are still accessible through any of the forked repositories.

Conclusion

I do find it ironic, that this same collaborative feature which Winamp tried to disallow us from using - forking their repo, is also the one which in the end will not allow them to ever escape the reality that they managed to leak some confidential data on their repository.

But hey, what's done is done, and it did allow me to learn more about how GitHub works with its repository networks and whatnot, so I guess it is possible to learn from someone else's mistakes. I hope you learned something from this too, at the very least to be very careful with what you push to GitHub. And if you do make a mistake - just delete the repo before it was forked, and try again. QED

In terms of the Winamp repository, I am happy that they decided to share their codebase. Even though you literally can't do anything with it apart from reading it, it's still a nice case-study. And I do not wish for them to regret going source-available, so I hope they don't get any legal problems.

But on the other hand, I do wish they'd gone fully open-source. I mean, what are they protecting right now? Winamp is a big part of history, everyone has at least heard of it, if not used it. But nowadays it's just that - part of history. But we've seen that through collaboration and openness of the developers, a lot of software can live for a very long time. Winamp could become something modern and fully maintained, if it allowed for outside contribution. I do hope they take that next step at some point. After they clean up this mess of a repo...

· 7 min read

Motivation

I've been trying to maintain a dotfiles repository for a few years now. There, I keep configurations for all kinds of different tools and applications I keep on my development machines. It's great for maintainability and versioning, but maintaining and keeping the dotfiles up to date can be a tedious task. But I've quite accidentally found a good and easy way to do it!

The three major options I've considered are:

  • Setting up a home directory as a --bare git repository.
  • Symlinking every configuration manually
  • Stow

The first option of the runt, is of course - from a storytelling point, the first one to discard.

Setting up your entire home directory as a repository, you have to be careful with exactly what to track, and what not. Basically, you'd need a .gitignore file that you'd have to constantly update with everything but the things you want to keep track of. It's very prone to accidentally adding something you don't want tracked, and forgetting to include it in the .gitignore. Plus, a giant git repo in my home directory isn't really to my taste.

Manual symlinking does solve those problems, but it can be quite complicated to automate and keep track of. Stow is an abstraction on top of symlinks, that allows us to automate symlink management, and turn it into package management. Let's see how to set up your dotfiles repo, in order to make use of stow.

Setup

Before using stow, my config files were laid out in a very simple way. Basically, everything that was in the $HOME/.config/ directory, was just copied into $HOME/code/dotfiles/.config/. Other configs that were just files or directories inside the $HOME directory, I just copied into the repo root $HOME/code/dotfiles/ - for example from $HOME/.bashrc to $HOME/code/dotfiles/.bashrc.

~/code/dotfiles
.
|-- .bashrc
|-- .config
| |-- gtk-3.0
| | `-- [... files]
| |-- i3
| | `-- [... files]
| |-- nvim
| | |-- after
| | | |-- ftplugin
| | | | `-- [... files]
| | | `-- plugin
| | | `-- [... files]
| | |-- init.lua
| | |-- lua
| | | `-- kiroki
| | | `-- [... files]
| | `-- plugin
| | `-- [... files]
| `-- terminator
| `-- [... files]
|-- i3blocks
| `-- [... files]
`-- .local
`-- share
`-- fonts
`-- [... files]

How stow likes it

Stow works more like (or exactly like) a package manager. We have to think of each configuration we manage as a package. So, instead of having a bunch of configurations under the .config directory, like $HOME/code/dotfiles/.config/i3 and $HOME/code/dotfiles/.config/nvim, we can split these into separate directories, in this example $HOME/code/dotfiles/i3/.config/i3 and $HOME/code/dotfiles/nvim/.config/nvim.

We can name them however though, so it could be $HOME/code/dotfiles/foo/.config/i3 for our i3 config.

And technically, if we want to be not-so-clever, we can just do something like $HOME/code/dotfiles/my-dot-config-directory/.config/<everything like i3 and nvim>. But the power of stow is that we can stow and unstow each config like a package. This technically means, that we can also version our configs. For example, we could have one version of i3 for Arch under $HOME/code/dotfiles/i3-arch/.config/i3, and one for Ubuntu under $HOME/code/dotfiles/i3-ubuntu/.config/i3. Because of these reasons, I recommend this package structure.

For another example, the .bashrc file is typically right in the $HOME directory, so we can "package" it simply as $HOME/code/dotfiles/bash/.bashrc. I know, I know - who uses bash anymore... well, I do apparently :)

tip

Stow is technically a package manager. To make full use of it, we can turn every configuration we contain in our dotfiles into a package, by placing it in its own directory.

How it is now

After we migrate to using stow, our repo structure now looks like this:

~/code/dotfiles
.
|-- bash
| `-- .bashrc
|-- fonts
| `-- .local
| `-- share
| `-- fonts
| `-- [... files]
|-- gtk-3.0
| `-- .config
| `-- gtk-3.0
| `-- [... files]
|-- i3
| `-- .config
| `-- i3
| `-- [... files]
|-- i3blocks
| `-- i3blocks
| `-- [... files]
|-- nvim
| `-- .config
| `-- nvim
| |-- after
| | |-- ftplugin
| | | `-- [... files]
| | `-- plugin
| | `-- [... files]
| |-- init.lua
| |-- lua
| | `-- kiroki
| | `-- [... files]
| `-- plugin
| `-- [... files]
|-- stow_config.sh
`-- terminator
`-- .config
`-- terminator
`-- [... files]

Usage

Stowing

Well, great. So far, we've basically just moved some directories around. So, what now?

Well, now we can just run stow for each of these newly created packages. The way that stow works, is that it takes the directory inside of the "package" directory, and creates a symlink to it in the parent of the current working directory.

So, for example, if we now cd into $HOME/code/dotfiles/, we can run stow i3. What this will do is, it will create a symlink to $HOME/code/dotfiles/i3/.config/i3 in $HOME/code/.config/. That will look something like this:

lrwxrwxrwx  1 kblagoev kblagoev   30 Oct  6 23:14 i3 -> ../code/dotfiles/i3/.config/i3/

"But wait!", I hear you say. "Isn't this i3 directory, or symlink, or whatever, supposed to be in our $HOME directory? What is it doing in $HOME/code/?".

You're absolutely right. Let's fix this. Stow has a flag -t, or --target, with which we can specify the root of the package management. This target is by default the parent of the pwd, and that's why by running stow inside of $HOME/code/dotfiles/, the symlinking occurred under $HOME/code/ (and resulted in our symlink being $HOME/code/.config/i3. It can be a bit confusing to keep track of this, but yeah). So, instead, we want to target the $HOME directory. That's why we should run stow -t $HOME i3 instead.

tip

If we don't place our dotfiles repository in the $HOME directory, we have to target it when we use stow by utilising the -t flag, e.g. stow -t $HOME i3.

Unstowing

Removing a config is super simple with stow as well. Following our example with i3, we can simply run stow -D -t $HOME i3. The -D flag deletes the symlink, and our config is gone from the $HOME/.config/ directory. And only that config!

Additional note on Usage

There is a flag --dotfiles, which allows to rename hidden directories, such as .whatever-the-name-is to dot-whatever-the-name-is, and for them to be pre-processed by stow by replacing dot- with .. This is useful, so there aren't hidden files and directories in the repo. Quite useful for easier searching that respects hidden files.

This is great and all, but in the latest version of stow on Ubuntu there's a bug with that. The bug is fixed in the newest release of stow, but I will wait for it to get updated in apt, before migrating to that setting - just for availability reasons.

But if you're going to install the latest version of stow, do keep that option in your mind. It's pretty neat.

And lastly, for my own convenience, I've written a bash script which can stow and unstow all the packages inside my repo with one command. I've opted into having a manually updated list of the packages, just because I keep some other junk in the dotfiles repo, but this can be changed. I will paste the script here, if you'd like to use it yourself (or a modified version of it).

stow_config.sh
#!/bin/bash

# Define an array of package names
packages=(
"bash"
"gtk-3.0"
"i3"
"i3blocks"
"terminator"
"nvim"
"fonts"
)

# Check if the first argument is "remove" to use the -D flag
stow_flag="-t"
if [ "$1" == "remove" ]; then
stow_flag="-D -t"
fi

# Loop through each package and run stow or unstow with -D
for package in "${packages[@]}"; do
if [ "$1" == "remove" ]; then
echo "Unstowing $package..."
else
echo "Stowing $package..."
fi

stow $stow_flag "$HOME" "$package"

if [ $? -eq 0 ]; then
if [ "$1" == "remove" ]; then
echo "$package unstowed successfully."
else
echo "$package stowed successfully."
fi
else
if [ "$1" == "remove" ]; then
echo "Error unstowing $package."
else
echo "Error stowing $package."
fi
fi
done

echo "All done!"


Running ./stow_config.sh will stow, and running ./stow_config.sh remove will unstow the listed packages.

That's it! glhf

· 5 min read

Motivation

If you're like me, you try and keep all of your coding-based clutter on a virtual machine. Which usually works great. You can maintain a clean OS, separate work from pleasure, and quickly return to a snapshot if something goes terribly wrong. But when I tried doing development for Android from a virtual machine, I quickly arrived at an unexpected hurdle.

If you try and run Android Studio's emulators, you'll quickly be reminded that you can't simply run a virtual machine inside a virtual machine. You technically can, if you enable Nested VT-x/AMD-V, but even if you succeed navigating the hell of starting an AVD android emulator from inside your VM, you'd be met by the huge performance hit of running nested virtualisation.

You can instead consider running either the Genymotion emulator or Xamarin Android Player, which both use Oracle's VirtualBox to run their emulators. But instead of running them inside your VM (and being met with the issue of nested virtualisation), you can run these emulators on your host OS. Since both of these use VirtualBox, you can take full use of the networking aspect of VMs to connect your development VM to your Android emulator VM!

note

Hence, my solution is to have two separate virtual machines running in VirtualBox on the host OS, and let them communicate using networking.

Setup

I'm assuming you've already

  1. Downloaded and installed VirtualBox
  2. Set up a development VM inside of VirtualBox
  3. Connected your dev VM to the outside world using either NAT or Bridged networking (I personally use bridged, since it helps me to easier access any web dev instances running in the VM)

Creating a virtual device

Alrighty, now we can download and install either Genymotion emulator or Xamarin Android Player on your host OS.

After you've done that, you can start up your software, and set up a virtual device (phone) by following the instructions.

created virtual device

Now we need to do some configuration work inside VirtualBox.

Configuring the virtual mobile device

If you open up VirtualBox, you'll see that the newly created virtual mobile device is listed in the list of machines.

list virtual devices

We need to edit the network settings for the mobile device. It will need two adapters. One is to connect to the network of the development machine (NAT or Bridged). In my case the machines are in a bridged network, which makes it easier to access from the host OS, as well as between each-other.

tip

For some development platforms like React-Native, it's important that both the dev machine and mobile device are on the same network to allow easy debugging.

mobile bridged adapter

The other, arguably more important adapter to add/enable is the Host-only Adapter. This is the one adb will connect over.

mobile host-only adapter

Make note of the adapter name here!

VirtualBox has the habit of creating multiple host-only adapters, so this name is very important to make note of.

Configuring the development VM

Now that we have set the mobile device settings up, we need to mirror them in the develpment VM. If you've used NAT for the mobile device, redo the settings in the development one. If you've put it into a bridged network, do the same to the dev VM.

After this, we need to add a Host-only Adapter to the dev VM. Did you take note of the Adapter name from the mobile machine? This is where you use it!

dev machine host-only adapter

Starting up the machines

Normally, you just start them from their respective applications. Start the mobile machine from Xamarin or Genymotion, and start your dev VM from VirtualBox.

But I've found that if I start the mobile machine from Genymotion, it tends to reset the Host-only Adapter name, add a new one, and fail to start. So, if this happens to you, this is what I do:

  1. Start the mobile machine from VirtualBox. A command-line terminal will pop up, and will start loading.
  2. When it appears that the terminal isn't doing anything anymore, you can safely start the mobile device from Genymotion.

mobile device ready to be started from genymotion

This is how my terminal looks when it stops loading. At this stage, I start the device from Genymotion as normal.

If you haven't already, you can now start your development VM as well.

Connecting to the mobile device

In this scenario, we are going to use adb to connect to the mobile device from the dev VM. All we need is the IP that the device is running on. Both Genymotion and Xamarin provide some way to see the IP.

genymotion shows ip

But if you're having trouble to find it, you can go to VirtualBox, and see the IP from the terminal we saw earlier.

virtualbox shows ip

So, now we can easily connect from our dev VM using the command-line tool adb

kblagoev@deva:~/Android/Sdk/platform-tools$ ./adb connect 192.168.68.101
* daemon not running; starting now at tcp:5037
* daemon started successfully
connected to 192.168.68.101:5555
kblagoev@deva:~/Android/Sdk/platform-tools$

Success!

And since I've used a bridged network, I can also easily do network connections between the two devices, which can be quite useful in some cases. So I recommend it, unless you have your own way of doing it.

Now you can develop! Have fun!

· 5 min read

This is a writeup for the Key Mission challenge, part of the Hack the box's Cyberapocalypse CTF 2021, category Forensics.

Prompt

The secretary of earth defense has been kidnapped. We have sent our elite team on the enemy's base to find his location. Our team only managed to intercept this traffic. Your mission is to retrieve secretary's hidden location.

· 2 min read

This is a writeup for the CaaS challenge, part of the Hack the box's Cyberapocalypse CTF 2021, category Web.

Prompt

cURL As A Service or CAAS is a brand new Alien application, built so that humans can test the status of their websites. However, it seems that the Aliens have not quite got the hang of Human programming and the application is riddled with issues.